Android Studio 攔截通知欄訊息 看到訊息又不會被標記已讀
大家好


這次想教大家如何攔截通知欄訊息
他可以實現已讀不回神器的功能
參考APP

https://play.google.com/store/apps/details?id=com.anonymtbj.tools.messagemonitor
大家可以下載來使用看看
那現在就直接教大家實現
程式碼
版面配置
首先要我們要在畫面上
顯示攔截到的訊息資訊
至activity_main.xml配置版面
分別顯示
通知的應用程式小圖示
通知的應用程式訊息大圖示
通知的應用程式包名
通知的訊息標題
通知的訊息內容
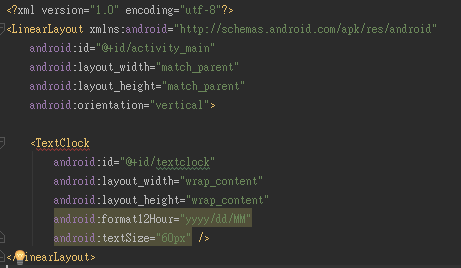
<?xml version="1.0" encoding="utf-8"?>
<LinearLayout xmlns:android="http://schemas.android.com/apk/res/android"
xmlns:app="http://schemas.android.com/apk/res-auto"
xmlns:tools="http://schemas.android.com/tools"
android:layout_width="match_parent"
android:layout_height="match_parent"
tools:context="com.anonymtbj.tools.notificationmonitor.MainActivity"
    android:orientation="vertical">
    <TextView
android:id="@+id/smallIcon_text"
android:layout_width="match_parent"
android:layout_height="wrap_content"
android:text="通知欄小圖示" />
<ImageView
android:id="@+id/smallIcon"
android:layout_width="match_parent"
android:layout_height="wrap_content"
android:layout_weight="1"
        app:srcCompat="@android:color/transparent" />
    <TextView
android:id="@+id/largeIcon_text"
android:layout_width="match_parent"
android:layout_height="wrap_content"
        android:text="通知欄大圖示" />
    <ImageView
android:id="@+id/largeIcon"
android:layout_width="match_parent"
android:layout_height="wrap_content"
android:layout_weight="1"
        app:srcCompat="@android:color/transparent" />
    <TextView
android:id="@+id/textView"
android:layout_width="match_parent"
android:layout_height="wrap_content"
android:layout_weight="1"
        android:text="TextView" />
</LinearLayout>
activity_main.xml

通知存取代碼
接下來我們要撰寫一個通知存取
需要創建一個java
這裡我們命名為NotificationMonitorService
當然名子是可以自訂的
創建後要繼承NotificationListenerService
extends NotificationListenerService
在使用NotificationListenerService時
要至AndroidManifest.xml註冊
如下代碼
<!-- 註冊通知欄擷取的服務 NotificationMonitorService -->
<service android:name=".NotificationMonitorService"
android:label="NotificationMonitor"
android:permission="android.permission.BIND_NOTIFICATION_LISTENER_SERVICE">
<intent-filter>
<action android:name="android.service.notification.NotificationListenerService" />
</intent-filter>
</service>
AndroidManifest.xml

這樣就可以開始撰寫了
NotificationListenerService
會有兩個監控功能
onNotificationPosted 有任何通知出現將觸發
onNotificationRemoved有任何通知被刪除將觸發
這裡我們主要用到
onNotificationPosted 有任何通知出現將觸發
在通知觸發時我們要讀取通知的訊息資料
代碼及說明如下:
NotificationMonitorService.java

Bundle extras = sbn.getNotification().extras;
String packageName = sbn.getPackageName(); // 取得應用程式包名
String title = extras.getString(Notification.EXTRA_TITLE); // 取得通知欄標題
String text = extras.getString(Notification.EXTRA_TEXT); // 取得通知欄文字
Drawable smallIcon = null;
try { // 取得通知欄的小圖示
int iconId = extras.getInt(Notification.EXTRA_SMALL_ICON);
PackageManager manager = getPackageManager();
Resources resources = manager.getResourcesForApplication(packageName);
smallIcon = resources.getDrawable(iconId);
} catch (PackageManager.NameNotFoundException e) {
    e.printStackTrace();
}

final Bitmap largeIcon = sbn.getNotification().largeIcon; // 取得通知欄的大圖示
顯示資料代碼
資料取得後要將資料顯示出來
把資料傳送至MainActivity.java
在顯示至畫面上
在MainActivity.java
宣告元件以及
撰寫一個接收資料的Class
然後即時更新版面資訊
代碼如下
MainActivity.java上半部 宣告元件

下半部 接受資料及即時更新畫面

MainActivity.java
public class MainActivity extends AppCompatActivity {

    private static TextView textView;
private static ImageView smallIcon,largeIcon;
private static Drawable drawableIcon;//儲存通知訊息的應用程式小圖示
private static Bitmap bitmapIcon;//儲存通知訊息大圖示
private static String string;//儲存包名、標題、內容文字
    @Override    protected void onCreate(Bundle savedInstanceState) {
        super.onCreate(savedInstanceState);
setContentView(R.layout.activity_main);
textView = (TextView) findViewById(R.id.textView);
smallIcon = (ImageView) findViewById(R.id.smallIcon);
largeIcon = (ImageView) findViewById(R.id.largeIcon);
}
//接收資料
    static void show(String packageName, String title, String text, Drawable small, Bitmap large){

        string = "包名:" + packageName + "\n\n" +
                "標題:" + title + "\n\n" +
                "文字:" + text + "\n\n" ;
drawableIcon = small;
bitmapIcon = large;
        new Thread(new Runnable(){
            public void run(){
                Message msg = Message.obtain();
                handler.sendMessage(msg);            }
        }).start();
}
//更新畫面
    private static Handler handler = new Handler() {
        public void handleMessage(Message msg) {
            super.handleMessage(msg);
try {
                //將資料顯示,更新至畫面
                textView.setText(string);
smallIcon.setImageDrawable(drawableIcon);
largeIcon.setImageBitmap(bitmapIcon);
            }catch (Exception e){}
        }
    };
}
最後至NotificationMonitorService.java
呼叫Show()把資料傳送過去
MainActivity.show(packageName,title,text,smallIcon,largeIcon);
NotificationMonitorService.java
Bundle extras = sbn.getNotification().extras;
String packageName = sbn.getPackageName(); // 取得應用程式包名
String title = extras.getString(Notification.EXTRA_TITLE); // 取得通知欄標題
String text = extras.getString(Notification.EXTRA_TEXT); // 取得通知欄文字
Drawable smallIcon = null;
try {
// 取得通知欄的小圖示
int iconId = extras.getInt(Notification.EXTRA_SMALL_ICON);
PackageManager manager = getPackageManager();
Resources resources = manager.getResourcesForApplication(packageName);
smallIcon = resources.getDrawable(iconId);
} catch (PackageManager.NameNotFoundException e) {
    e.printStackTrace();
}

final Bitmap largeIcon = sbn.getNotification().largeIcon; // 取得通知欄的大圖示
MainActivity.show(packageName,title,text,smallIcon,largeIcon);//傳送資料
注意:執行前要把最小版本改為19否則將報錯
build.gradle( Module: app ) 中的 minSdkVersion 須改為 19
Gradle Scripts/build.gradle( Module: app )

執行後發現沒有任何動作
不用擔心
因為還沒要求使用者開啟權限
開啟權限後NotificationMonitorService
就會自動開始監控通知訊息
權限要求代碼
首先要加入判斷通知欄擷取權限是否開啟
(使用通知欄擷取需請使用者開啟權限
這裡我們撰寫自動跳轉至通知存取,
讓使用者開啟權限)
檢查通知存取權限是否開啟,
開啟回傳true ,未開起回傳false
private boolean isPurview(Context context) { // 檢查權限是否開啟 true = 開啟 ,false = 未開啟
Set<String> packageNames = NotificationManagerCompat.getEnabledListenerPackages(context);
    if (packageNames.contains(context.getPackageName())) {
        return true;
    }
    return false;
}
在應用程式啟動時判斷 isPurview 回傳的值如果不是true ,
就跳出彈跳視窗 告知使用者前往開啟通知存取權限
前往按鈕觸發就會透過
startActivity(new Intent("android.settings.ACTION_NOTIFICATION_LISTENER_SETTINGS"));
前往至 通知存取權限 開啟後擷取
if(!isPurview(this)){ // 檢查權限是否開啟,未開啟則開啟對話框
    new AlertDialog.Builder(MainActivity.this)
            .setTitle(R.string.app_name)
            .setMessage("請啟用通知欄擷取權限")
            .setIcon(R.mipmap.ic_launcher_round)
            .setOnCancelListener(new DialogInterface.OnCancelListener() {
                @Override
public void onCancel(DialogInterface dialog) { // 對話框取消事件
finish();
                }})
            .setPositiveButton("前往", new DialogInterface.OnClickListener() { // 對話框按鈕事件
@Override
public void onClick(DialogInterface dialog, int which) {
// 跳轉自開啟權限畫面,權限開啟後通知欄擷取服務將自動啟動。
startActivity(new Intent("android.settings.ACTION_NOTIFICATION_LISTENER_SETTINGS"));
}}
).show();
}
MainActivity.java


執行畫面
防止通知欄擷取失效代碼
最後防止通知欄擷取失效
另外撰寫一個Service
來監控通知欄擷取是否失效
首先創建一個java
命名為MainService(可自訂)
繼承Service
extends Service
在至AndroidManifest.xml加入
<service android:name=".MainService"/>

再回到MainService.java加入代碼
代碼及說明
MainService.java

@Override
public void onCreate() {
super.onCreate();
new Thread(new Runnable() {
@Override
public void run() { // 每 10 秒檢查通知欄擷取是否失效
while (true){
                try{
                    Thread.sleep((10*1000));
isNotificationMonitorService();
                }catch (Exception e){}
            }
        }
    }).start();
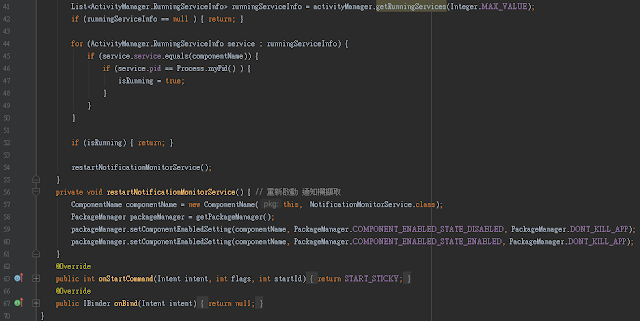
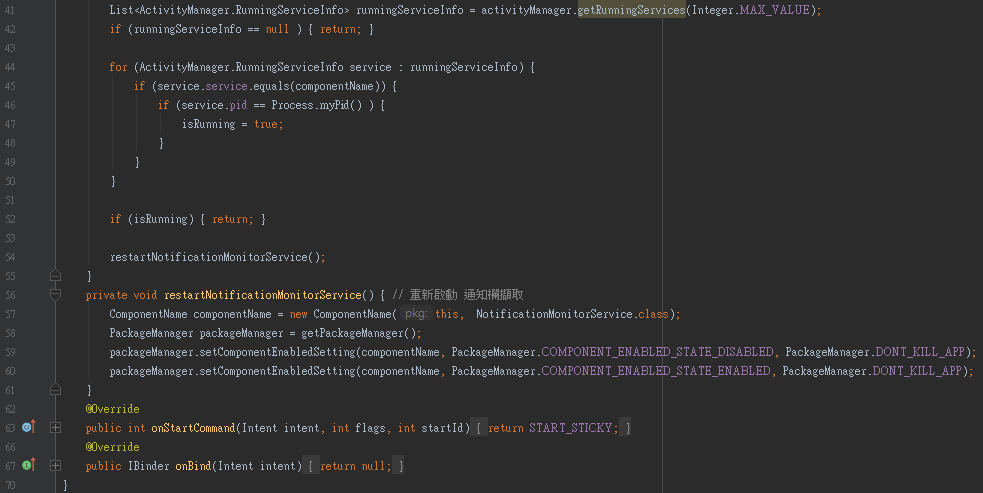
}

private void isNotificationMonitorService() {
    // 檢查通知欄擷取是否失效,
// 如果失效 將呼叫 restartNotificationMonitorService() 重新啟動 通知欄擷取
// 如果未失效 將不動作
ComponentName componentName = new ComponentName(this, NotificationMonitorService.class);
ActivityManager activityManager = (ActivityManager) getSystemService(Context.ACTIVITY_SERVICE);
boolean isRunning = false;
    List<ActivityManager.RunningServiceInfo> runningServiceInfo = activityManager.getRunningServices(Integer.MAX_VALUE);    if (runningServiceInfo == null ) { return; }

    for (ActivityManager.RunningServiceInfo service : runningServiceInfo) {
if (service.service.equals(componentName)) {
if (service.pid == Process.myPid() ) {
isRunning = true;
            }
        }
    }

    if (isRunning) { return; }

    restartNotificationMonitorService();
}
private void restartNotificationMonitorService() { // 重新啟動 通知欄擷取
ComponentName componentName = new ComponentName(this, NotificationMonitorService.class);
PackageManager packageManager = getPackageManager();
packageManager.setComponentEnabledSetting(componentName, PackageManager.COMPONENT_ENABLED_STATE_DISABLED, PackageManager.DONT_KILL_APP);
packageManager.setComponentEnabledSetting(componentName, PackageManager.COMPONENT_ENABLED_STATE_ENABLED, PackageManager.DONT_KILL_APP);
}
@Override
public int onStartCommand(Intent intent, int flags, int startId) {
    return START_STICKY;
}
@Override
public IBinder onBind(Intent intent) {
    return null;
}
MainService這裡設定每10秒
執行isNotificationMonitorService
來檢查通知欄擷取是否失效
如果失效會呼叫
restartNotificationMonitorService
進行重啟
當然 MainService要在應用程式開啟時就啟動
所以啟動代碼要加入在
MainActivity.java 的onCreate裡
startService(new Intent(this, MainService.class));

這樣就大功告成拉!!
是不是很簡單啊~

留言
張貼留言